Welcome to Perfect Dovetails - the website that helps woodworkers make perfect dovetail joints every time - beautifully and efficiently
Dovetails - the woodworker's dream and nightmare
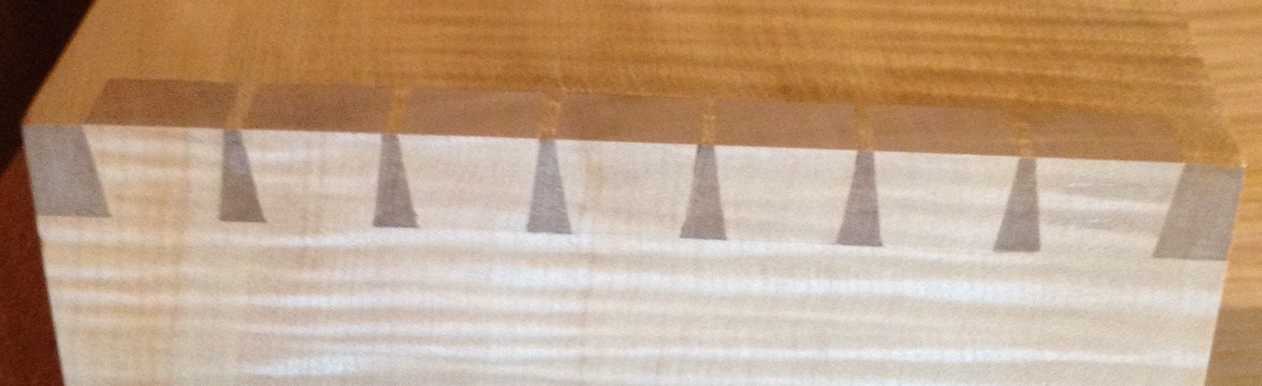
Dovetails are one of the most beautiful and functional joints a woodworker can make, but also one of the most time-consuming and frustrating if you do it by hand. Joining two boards with, say, 5 dovetails involves 22 separate saw cuts even before you start removing the waste between the pins and tails. With all these cuts needing to be in the right place, at the correct angle and square in the other dimensions, the opportunity for error is great. Unless you have spent a lot of time perfecting your technique, making a set of drawers with dovetailed corners by hand is a daunting task (that's 88 cuts per drawer - or about 1000 cuts for the 10-drawer chest from which the picture above was taken). Not surprising, then, that an array of aids are available to the amateur (and professional) to make the task easier and quicker. These generally involve a router machine, some special router bits and a jig or other method of guiding the cuts. There are a number of disadvantages to these methods, aside from the very significant investment in equipment which may not be used very frequently. Router-cut joints are often said to look obviously "machine made" (skinny pins are out); tear-out can occur which ruins the look; and the cheaper jigs cannot cut traditional "through" dovetails.
An alternative is to use a general-purpose bandsaw to make the saw cuts. A bandsaw is probably the most versatile woodworking machine you can have and is in frequent use in the workshop, unlike those router jigs. However, this approach has hitherto only solved half the problem, and the easy half at that. For example, the method described in Lonnie Bird's (excellent) "The Bandsaw Book" cuts the pins using a series of simple spacers and the bandsaw table at an angle. However, the tails then have to be marked out by hand using the pins as a template - a tricky task which is prone to error - and the tails then need to be cut "freehand".
"Perfect Dovetails" resolves this problem by providing a method by which the pins and tails can be cut using the same layout method. As a result, usually the joint will fit "straight from the saw" with only minimal cleaning up. So, if you have a bandsaw, no further investment is required to cut dovetails quickly, accurately and consistently. No tear-outs, no gaps and no hassle.
"Perfect dovetails" - great dovetails every time without fancy jigs
So how does it work? There are two alternative methods:
- The "spacer" method is very simple and requires very little investment in components or preparation. You just need some scrap timber. However there is a bit of scope for error so care is required.
- the "jig" method does involve making a simple jig first, but after that it is even easier than the spacer method and, with just a little care, is very accurate.
These methods are described in outline on this page, with detailed instructions in the "How To" sections.
The "spacer" method
For cutting the pins, all that is required is a set of simple spacers as described by Lonnie Bird. The spacers are placed together to set up the fence and then removed one by one as the pins are cut. The table is tilted by the required angle first in one direction then the other. If the bandsaw does not have a tilting table then a sloping wooden jig can be made. However, this method only cuts the pins. To cut the tails requires three additional features:
- An angled wooden jig to place against the fence.
- Caps on the spacers to hold them square to the jig when making the cuts.
- An offset or "filler" piece to set up the fence such that the tails exactly match the pins.
The tails are then cut in a similar fashion to the pins, but with the table level and using the angled jig against the fence. Removal of the waste between the pins and tails does need to be (at least partly) done by hand, but this is a simple task if the correct techniques are followed.
The "jig" method
This method comprises the construction of a simple jig - essentially a sliding base with a couple of fixing points - and a "pegboard" for making the specific joint. Instructions are provided for making the jig base, althought the exact details will depend on the particular bandsaw that it needs to be made to fit. A tilting bandsaw table is essential.
The pegboard is fixed to the base and the holes in the pegboard are used to fix a "floating" fence. The table is tilted to cut the pins and the fence is rotated by the required ange to cut the tails. The design of the pegboard enables all of this to be done using exactly the same holes and referencing from the same side of the boards to be joined, which provides for considerable accuracy. Removal of waste is similar to before, but if this is done cleanly then very little fitting adjustment should be necessary.
Which method to use?
| "Spacers" | "Jig" | |
| Cost | Virtually no cost - just scrap timber. | Very low cost - base and maybe a couple of toggle clamps. |
| Set-up time | Perhaps an hour to make the spacers accurately, after which they can be re-used in similar joints. | An afternoon to make the jig, then less than 30 minutes* to make each pegboard which can be used to make similar joints. |
| Time per joint | Depending on skill level: about 30 minutes for a 5-tail joint | Similar |
| Quality of result | Should be very good, but it is essential that the boards are of equa;l width. | High quality result should be possible even for boards of unequal width. Tails need to be cut face down, so a sharp blade is important. |
| Flexibility | Practically any angle, however silly, is possible (up to the limit of your bandsaw tilt). | Most jigs will handle angles of 2 to 15 degrees, otherwise a special jig may be needed. |
| Size of joint | The maximum width boards that can be joined is approximately the distance from the fence to the blade when the fence is on the 'pier' side. The board depth can be (practically) anything you want. | Normally the board width is a little less than with the spacer method, but there is a technique by which you can cut boards twice this width. The board depth is limited by the depth of the fences on your jig. |
| Ease of use | Easy to use, but you do need to concentrate on using the correct spacers | Less error-prone in that setting up each set of cuts is more obvious and logical |
| Best for:- | Occasional use | Repeated use |
| *Assuming you have a drawing application from which to print the template. | ||
About this website
What this website does for you
Ordinarily, the calculations required for the sizes of spacer and filler pieces, or for the location of the holes in the pegboard, would be enough to put most woodworkers off. Even if complex trigonometry is child's play to you, it is certainly not something you would choose to do every time you want to make a joint. In particular asymmetric joints (e.g. drawers) or joints with unequal tails are hideously complex to calculate. Fortunately, you don't have to calculate at all. This website does all the maths for you.
The problem is solved by using the "Perfect Dovetails" calculator (see the Design Tool). If you are using the spacer method, this tells you exactly what size spacers (and filler) to make for any dovetail configuration. If you are using the jig method then it will design the pegboard for you and will even allow you to download a template so that you can simply print it, paste it onto a board and make the pegboard without any measuring!
You can do asymmetric joints, unequal tails and pins or whatever takes your fancy, assuming it will work as a joint. The calculator will also warn you if there are potential problems with your joint, e.g. insufficient space between the tails for the saw to pass through. Furthermore, it gives you an instant graphical representation of your joint so that you can visually check it. Dovetails of any angle (within reason) can be designed, including finger joints, provided that the same angle is used throughout. Lapped dovetails can also be designed, but some hand saw, chisel and/or router work is required to cut the pins.
The end result is a beautiful dovetail joint that looks like it has been cut by hand, accurately.
Guide to the website
This website is currently in beta-testing: not all the planned content is included and there might possibly be errors in calculations, so use at your own risk (make a test joint first). If you wish to save details of your projects and/or jigs, you will need to register first in order to use the database. Otherwise print (to pdf or paper) to save your work. I reserve the right to introduce a small charge for database use or "professional" functions at a later date, once beta-testing is complete.
The body of the website includes:
- Detailed descriptions of how to use the Perfect Dovetails methods, including diagrams and photographs.
- The Perfect Dovetails Design Tool and calculator.
- A guide to using the design tool
- An instruction sheet (one for each method) to use in the workshop.
- A support and comments section for FAQs and any helpful feedback and suggestions for improvements.
- Links to other useful related sites.
Safety Notice
The use of any sharp tools, and in particular powered tools, necessarily involves a degree of risk. It is the user's responsibility to implement safe working practices. If you are unfamiliar with these, then acquire appropriate training before proceeding. The author accepts no responsibility for any unwanted consequences of following the procedures described in this web site.